
Introduction
EFB Preferences are set at both the company level and the aircraft type level. Company EFB Preferences set the overall behavior of the EFB and the interaction between FlightSpan™ and the EFB. Then, Aircraft Type EFB Preferences address issues that are specific to each aircraft type. Where the preferences overlap, the Aircraft Type EFB Preferences will override the Company EFB Preferences.
Most EFB preferences only affect the EFB; however there are a limited number of preferences that are also used by FlightSpan Ops.
Additionally, on the EFB, there are a limited number of preferences that can be changed on a temporary basis. The preferences set on the EFB will remain in place until the app is closed and reopened, at which time the preferences will be reset to the defaults.
Preferences are arranged alphabetically in FlightSpan, but have been divided topically in this document to aid in locating specific preferences.
Company EFB Preferences
To open Company EFB Preferences, select Company from the Settings menu, then click on the company name.
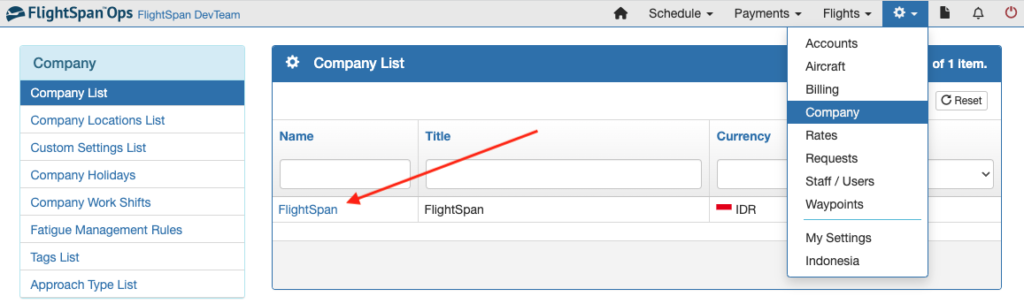
Use the search window to find the specific setting you are looking for, and click the blue pencil icon to edit the setting.

Company DFR Preferences
- Custom Flight Number Format – Allows you to customize the DFR flight number format
- DFR: Allow ATD/ATA Edits – Grants the pilot the ability to change the ATD/ATA times that were automatically captured by the EFB.
- DFR: Allow Auto Filling Missing Flight Times – Adds an Auto Fill button next to the Hobbs entry cells which will proportionally distribute to each leg the total Hobbs time as flight time. It will also automatically add one landing and one engine start per leg.
- DFR: ATD/ATA Time Format – Determines whether departure and arrival times are recorded in UTC or Local time.
- DFR: Flight Time Format – Determines whether flight time is recorded in minutes or hours/tenths of an hour on the printed DFR.
- DFR: Print Actual Landing Weight – Adds or removes a column to the printed DFR that records the actual landing weight for each leg.
- DFR: Print Actual Takeoff Weight – Adds or removes a column to the printed DFR that records the actual takeoff weight for each leg.
- DFR: Print ATD/ATA – Adds or removes a column to the printed DFR that records the actual departure and arrival times for each leg.
- DFR: Print Basic Operating Weight – Adds or removes a column to the printed DFR that records the basic operating weight for each leg.
- DFR: Print Cash Received – Adds or removes a column to the printed DFR that records the cash received for each leg.
- DFR: Print Center of Gravity – Adds or removes a column to the printed DFR that records the center or gravity for each leg.
- DFR: Print Departure Fuel – Adds or removes a column to the printed DFR that records the Departure Fuel for each leg.
- DFR: Print Fuel Used – Adds or removes a column to the printed DFR that records the fuel used for each leg.
- DFR: Print Max Landing Weight – Adds or removes a column to the printed DFR that records the max landing weight for each leg.
- DFR: Print Max Takeoff Weight – Adds or removes a column to the printed DFR that records the max takeoff weight for each leg.
- DFR: Print Zero Fuel Weight – Adds or removes a column to the printed DFR that records the zero fuel weight for each leg.
- DFR: Record Block Time – Adds or removes a column to both the electronic and the printed DFR that records the block time for each leg. When paired with v2Track, block in and block out are automatically captured.
- DFR: Require Purpose Code – When set to Yes, a missing Purpose Code will be highlighted yellow and DFR uploads will be prevented.
- DFR: Use Hobbs Start and Stop Times – When set to Yes, a Hobbs Out and a Hobbs In will be required. If set to No, a single total Hobbs elapsed time will be required. When set to No, the EFB Preference Use Flight Time In Place Of Hobbs Time: should be set to Yes.
- DFR: Validate Aircraft Weights And Fuel Before Upload – When set to Yes, takeoff and landing weight and balance will be checked to be within aircraft and runway limitations, and departure and arrival fuel will be verified within company reserve limits. If out of limits, a warning will pop up. You can elect to Cancel and correct the errors, or Continue and upload with the errors.
- DFR: Validate Missing Leg and Load Information – When set to Yes, missing load information (receipt number, description, rate, weight, etc.) will be flagged on DFR upload.
- DFR: Validate Pax and Cargo On Time Based Rates – When set to Yes, if there is no pax or cargo on a load item with a time-base rate, pax and cargo fields will be highlighted in yellow to prompt for input. If set to No, then the only validation and yellow highlighting will be if the Mins field is empty (this is also flagged with the setting set to Yes).
- Print Operational Flight Plan and Journey Log with DFR? – Select which documents will be printed with the DFR when the DFR is uploaded. When set to None, only the DFR will print.
- Prompt For Pax Names When Creating Cash Receipts – If set to No, then the description on a passenger load for a cash receipt will be the number of pax the pilot selected (with the assumption that the pilot has written the passenger names on a paper ticket and the FlightSpan Ops data entry clerk will do the manual entry of the passenger names after DFR upload).
- Record Duty Time With DFR Upload – When set to Yes, a Duty Time recording window will open after DFR upload. Duty time can be recorded or canceled.
- Show Both Account # and Account Name On DFR – When set to Yes, both account number and name will be recorded on the printed DFR. When set to No, only the account number will be printed.
- Use Flight Time In Place Of Hobbs Time: Normally this should be set to No. But if any of your aircraft are not equipped with a Hobbs meter, or if the EFB Preference DFR: Use Hobbs Start and Stop Times is set to No, then this preference should be set to Yes. Aircraft time will be recorded based on the values in the Flight Time column of the DFR, not based on any Hobbs meter values.
Company Finance Preferences
- Account Number To Charge For 2nd Crew – If a charge is made for a second crew member, type in the account number or name to use. Create a load on the EFB, select the Non Revenue Items load type, then Second Crew. The account number will be entered on the DFR load.
- Account Number To Charge For ATC Delays – If a charge is made for ATC delays, type in the account number or name to use. Create a load on the EFB, select the Non Revenue Items load type, then ATC Delays, and the minutes flown. The account number will be entered on the DFR load.
- Account Number To Charge For Dropping Company Fuel – If a charge is made for delivering company fuel, type in the account number or name to use. Create a load on the EFB, select the Non Revenue Items load type, then Drop Company Fuel, and the quantity of fuel dropped. The account number will be entered on the DFR load.
- Account Number To Charge For RTS – If a charge is made for return to service / operational check flights / maintenance flights, type in the account number or name to use. Create a load on the EFB, select the Non Revenue Items load type, then RTS / Maintenance and the minutes flown. The account number will be entered on the DFR load.
- Account Number To Charge For Training – If a charge is made for training flights, type in the account number or name to use. Create a load on the EFB, select the Non Revenue Items load type, then Training / Proficiency, and the minutes flown. The account number will be entered on the DFR load.
- Account Number To Charge For Using Company Fuel – If a charge is made for using company fuel, type in the account number or name to use. Create a load on the EFB, select the Non Revenue Items load type, then Use Company Fuel and the quantity of fuel used. The account number will be entered on the DFR load.
- Account Number To Charge For WX Flying – If a charge is made for weather delays, type in the account number or name to use. Create a load on the EFB, select the Non Revenue Items load type, then WX, and the minutes flown. The account number will be entered on the DFR load.
- Default Rate Code – If you type in a rate code, this rate code will be at that top of the Rate pick list, highlighted in blue (puts the most commonly used rate at the top of the list).
- Divide Currency By – For currencies with large numbers, enter the divisor. For example, with a divisor of 1000, a cash amount entered on the EFB as 55 would be recorded on the DFR as 55,000. The divisor will be applied only to the currency set in the “Pilot Receipts billing_currency_id” preference.
- Pilot Receipts billing_currency_id – the FlightSpan Ops currency id for the currency received by pilots when writing cash receipts in the field. To determine the currency id, open the Currency List and search for and hover over the currency name. A url will be displayed in the bottom left corner of your screen; the last part of the url will be id=x. Enter the x value.
- Produce Rate – If flying produce is charged at a special rate, enter the Rate Code here. When creating a load on the DFR and produce is selected on the Load Description, the rate will be entered on the DFR.
- Rate To Use For 2nd Crew – If a charge is made for a second crew member, enter the Rate Code to use. Create a load on the EFB, select the Non Revenue Items load type, then 2nd Crew. The Rate Code will be entered on the DFR load.
- Rate To Use For ATC Delay – If a charge is made for ATC Delays, enter the Rate Code to use. Create a load on the EFB, select the Non Revenue Items load type, then ATC Delay and the minutes flown. The Rate Code will be entered on the DFR load.
- Rate To Use For Dropping Company Fuel – If a charge is made for dropping company fuel, enter the Rate Code to use. Create a load on the EFB, select the Non Revenue Items load type, then ATC Delay and the quantity of fuel delivered. The Rate Code will be entered on the DFR load.
- Rate To Use For Positioning – If a charge is made for positioning flights, enter the Rate Code to use. Create a load on the EFB, select the Non Revenue Items load type, then Positioning and the minutes flown. The Rate Code will be entered on the DFR load.
- Rate To Use For RTS – If a charge is made for return to service / operational check flights / maintenance flights, enter the Rate Code to use. Create a load on the EFB, select the Non Revenue Items load type, then RTS / Maintenance and the minutes flown. The Rate Code will be entered on the DFR load.
- Rate To Use For Training – If a charge is made for Training, enter the Rate Code to use. Create a load on the EFB, select the Non Revenue Items load type, then Training and the minutes flown. The Rate Code will be entered on the DFR load.
- Rate To Use For Using Company Fuel – If a charge is made for using company fuel, enter the Rate Code to use. Create a load on the EFB, select the Non Revenue Items load type, then Use Company Fuel and the quantity used. The Rate Code will be entered on the DFR load.
- Rate To Use For WX Flying – If a charge is made for weather delays, enter the Rate Code to use. Create a load on the EFB, select the Non Revenue Items load type, then WX and the minutes flown. The Rate Code will be entered on the DFR load.
- Standard Adult Cargo Allowance – Set the default cargo load for adults that will be prefilled on the cargo entry screen when adding passengers. The amount will be multiplied by the number of adults and added to the cargo for children and infants.
- Standard Child Cargo Allowance – Set the default cargo load for children that will be prefilled on the cargo entry screen when adding passengers. The amount will be multiplied by the number of children and added to the cargo for adults and infants.
- Standard Infant Cargo Allowance – Set the default cargo load for infants that will be prefilled on the cargo entry screen when adding passengers. The amount will be multiplied by the number of infants and added to the cargo for adults and children.
Company Flight Plan Preferences
- Flight Plan: Company Name – Set the company name you wish to appear on flight plans.
- Flight Plan Email Address: cc (comma separated list) – Enter the email address(es) to receive a copy of flight plans.
- Flight Plan Email Address: To (comma separated list) – Enter the email address(es) to submit flight plans to.
- Flight Plan: Email Body Text – Type the text you wish to appear in the body of the email with the flight plan attached.
- Flight Plan: Fax Number – For display on non-ICAO flight plan forms when required.
- Flight Plan: Phone Number – Enter the number to be displayed on the ICAO flight plan form.
- Flight Plan: Show Non-ICAO Waypoints? – When set to Yes, non-ICAO waypoints included in the route (i.e. a route constructed between departure and destination waypoints) will be displayed on the flight plan; when set to No, non-iCAO routes will be excluded.
- Flight Plan: Use non-ICAO form – Set to Yes only for operators in countries using a non-standard flight plan form. The form must be custom designed with the help of FlightSpan Support.
- Print Basic Flight Plan / NavLog with DFR? – Enables upload of the Basic Flight Plan / NavLog
- Show Flight Release Signature On Journey Log – When set to Yes, a signature line is added to the Journey Log.
Company Miscellaneous Preferences
- App Update Prompt: Replace App Store Button With This Text – Whatever text is entered will be added as a new paragraph below the existing prompt, and the button that takes the user to the App Store will be removed.
- Cruise Altitude System – Choose the cruise altitude system used for the altitudes automatically selected on the Nav page.
- Default Email App – (not yet implemented) Select the email app that you wish to open when sending NOTAMs and inspection reports. Note that attachments cannot be sent using anything other than iOS Mail.
- Fuel Units Used By Fuel Vendors – Select the fuel units used when purchasing fuel.
- Pilot Weight Units – Select Kilograms or Pounds.
- Produce Name – If a special rate is charged for produce, set the name here. The option will be listed under Load Description when creating a new load. See Produce Rate for details and to set the rate. If you do not need a category for produce, change the name to anything you desire to be in the list, for example Cargo.
- Record Landing Fuel After Last Leg – When set to Yes, the Fuel Remaining box will open when completing the last leg of the flight.
- Show Post Landing Checklist – When set to yes, the post landing checklist will be displayed on the Arrival/Post Landing tab. The contents of the checklist are set under Aircraft Type EFB Preferences/After Landing Checklist Items preference.
- Time Format – Select Zulu or Local for the default time format displayed on the Map tab.
- Update Scheduled Flights With Actual Departure Times – when enabled, scheduled flights will be shifted to match the ATD of the actual/completed flight when the DFR is uploaded
- Which Reserve Fuel Level to Use For Popup Warning – Select Reserve Level 1 or Reserve Level 2 to pop up on the Nav tab when the planned reserve is exceeded. Reserve levels are set under Aircraft Type EFB Preferences/Company Fuel Reserve preferences.
Company Waypoints Preferences
- Days To Display Expired Notams – Enter the number of days you wish expired or canceled NOTAMs to appear with a strikethrough at the top of runway charts.
- Hazard Reports Email Address: cc – Enter the email address to receive a copy of Hazard Reports / NOTAMs notifications.
- Hazard Reports Email Address: To – Enter the email address to receive notification of Hazard Reports / NOTAMs.
- ICAO Airport Prefix: (not yet implemented) If an ICAO Airport Prefix is entered then you may search for airports without first entering the prefix. For instance instead of searching for ‘KLAX’ you can start typing ‘LA…’ and KLAX will appear in the list.
- Keep Waypoint Search Open: if set to Yes, then when creating a route the search picklist for waypoints remains open (allowing you to search and add multiple airports in a sequence) until the user taps Done or Back To Home Base.
- Limit Takeoff Available Runway Length To Max Runway Usable Setting – When set to the default of “Yes”: If a runway has available length set to more than the Aircraft EFB Preference Takeoff Max Runway Usable, then the greater length is ignored and Takeoff Max Runway Usable is used for the redline. When set to “No”: If a runway has available length set to more than the Aircraft EFB Preference Takeoff Max Runway Usable, then the greater length is used for the redline.
- Mileage For Checkpoints (in nm, comma-separated list) – Checkpoints at the entered distances will be automatically created when departing from or arriving at home base. Switch the feature on and off from the Use Mileage Based Checkpoints preference.
- Runway Inspection Interval (months) – enter the desired runway inspection interval. A Runway Inspection Due banner will appear at the top of runway charts when an inspection is due.
- Runway Inspections Email Address: cc – Enter the email address to receive a copy of runway inspection reports.
- Runway Inspections Email Address: To – Enter the email address to receive runway inspection reports.
- Runway Length Units – Select the standard unit of measure for runway length.
- Use Favorite Airports List – When set to Yes, all waypoints identified as Favorites in the waypoint database will be displayed at the top of the route planner screen.
- Use Mileage Based Checkpoints – When set to Yes, checkpoints will be automatically created when departing from or arriving at home base. Set the distances under the Mileage for Checkpoints preference.
Company Weight and Balance Preferences
- Default Passenger Weight (kg) – Set the default passenger weight for use in weight and balance calculations and when creating Loads. If your default units are pounds, convert the default passenger weight in pounds to kilograms.
- Show How Far Under Runway Weight Limits – When set to On, the amount below the aircraft weight limit (or the runway takeoff and landing weight limits) will be displayed in parenthesis on the weight and balance page.
Company v2Track Preferences
- Allow Auto Trip Feature? – Enables sending your trip manifest only once before the first takeoff, and reporting on the ground only once after the final landing.
- v2 Auto-Dismiss ACK Type Message Replies – When set to Yes, “Acknowledge” messages from the v2 website will be automatically dismissed on the Message Tab. When set to No, the pilot must dismiss any “Acknowledge” message.
- v2 Log Tracker Traffic – When set to On, communication between the v2 tracker and FlightSpan is recorded which can aid in troubleshooting.
- v2 QuickText List (comma separated list) – Enter the list of messages that will be available on the Message tab using the Quick Text button.
- v2 Request Weather Report Text – Enter the prefix to be used in the weather report request message for each destination in the planned flight.
- v2 Tracker Bluetooth Address – All v2Track Bluetooth addresses are the same and should not need to be changed.
- v2 Use Manual FlightWatch – FlightWatch is a v2Track feature that will send an alert if a report has not been received from an airborne aircraft in the last 10 minutes. See the Flight Following documentation for details. If switched on, in most countries, FlightWatch is automatic, but due to a v2Track patent issue in the USA, FlightWatch must be manually activated. In the USA if the switch is set to Yes, SOPs must be developed or hardware installed for manually activating and deactivating FlightWatch.
Aircraft Type EFB Preferences
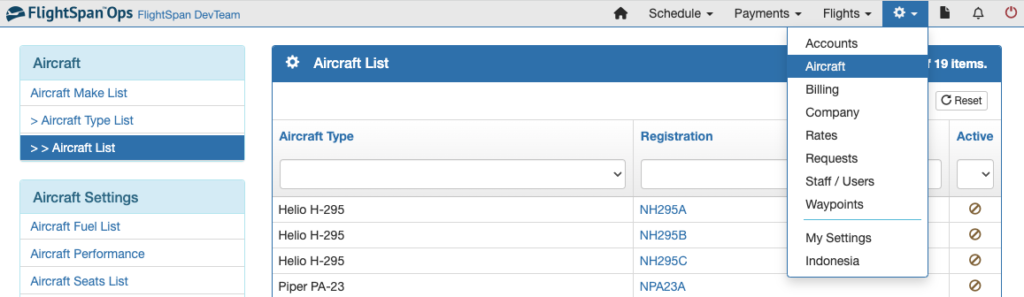
To open Aircraft Type EFB Preferences, first select Aircraft from the Settings menu.
Next select Aircraft Type List from the Aircraft menu on the left, and click on the aircraft Model you wish to edit.
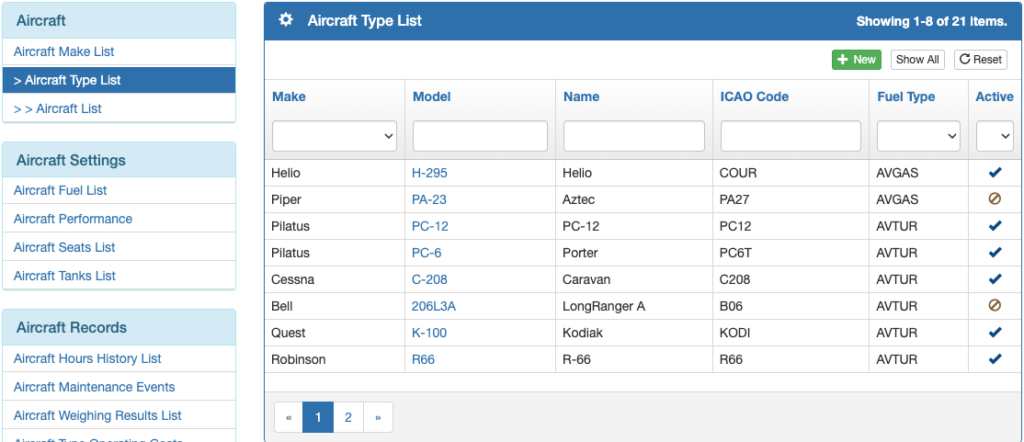
Use the search window to find the specific setting you are looking for, and click the blue pencil icon to edit the setting.

Aircraft Checklist Preferences
- After Landing Checklist Items (4 – 5 comma separated items) – Enter the after landing checklist items that will appear on the Arrival/Post Landing tab.
- After Start Checklist Items – Enter the after start checklist items
- Automatically Fire Enabled Checklists? – In flight checklists can be set for manual activation only (this can be particularly useful in a training environment where the flight profile may repeatedly trigger climb, cruise, and descent checklists)
- Climb Checklist Altitude – Set the height above ground level for the climb checklist to appear.
- Climb Checklist Items (5 comma separated items) – Enter the after landing checklist items that will appear on whatever page is open.
- Cruise Checklist Items – Enter the after start checklist items
- Descent Checklist Items – Enter the descent checklist items
- Only Show Cruise Checklist Once – When set to No, the cruise checklist will open each time a level off is detected.
- Only Show Descent Checklist Once – When set to No, the descent checklist will open each time a descent is detected.
- Show After Start Checklist – When set to Yes, the After Start Checklist will open four seconds after the Start Checklist is completed.
- Show Climb Checklist – Set to On to enable the Climb Checklist.
- Show Cruise Checklist – Set to Yes to enable the Cruise Checklist.
- Show Descent Checklist – Set to Yes to enable the Descent Checklist.
- Show Post Landing Checklist – When set to yes, the post landing checklist will be displayed on the Arrival/Post Landing tab. The contents of the checklist are set under Aircraft Type EFB Preferences/After Landing Checklist Items preference.
- Show Start Checklist – When set to Yes, the Start Checklist will open after the flight manifest is sent.
- Start Checklist Items
Aircraft DFR Preferences
- DFR: Log Engine Hobbs Times – When set to Yes, adds separate cells for recording engine (not airframe) Hobbs time.
- DFR: Record IFR Items – When set to Yes, columns for IMC and approaches are included on the DFR.
- DFR: Require Hobbs and Flight Time Match – When set to Yes, Hobbs and flight time must match before the DFR can be uploaded.
- DFR: Track Engine Cycles – When set to Yes, it adds a column to the electronic and printed DFRs for engine starts. At least one engine start will be required to upload a completed flight.
- DFR: Track External Load Flying (Helicopters) – When set to Yes, it adds a column to the electronic DFR (only) for logging external load flight time.
- DFR: Track Low Flying (Helicopters) – In some countries, tracking low flying is required by the regulator. When set to Yes, it adds a column to the electronic DFR (only) for logging external load flight time.
Aircraft Finance Preferences
- Account Number To Charge For 2nd Crew – This only needs to be set if the account number for the aircraft is different from that set at the Company EFB Preferences level. If a charge is made for a second crew member, type in the account number or name to use. Create a load on the EFB, select the NonRev load type, then 2nd Crew. The account number will be entered on the DFR load.
- Account Number To Charge For ATC Delays – This only needs to be set if the account number for the aircraft is different from that set at the Company EFB Preferences level. If a charge is made for ATC delays, type in the account number or name to use. Create a load on the EFB, select the NonRev load type, then ATC Delays, and the minutes flown. The account number will be entered on the DFR load.
- Account Number To Charge For Dropping Company Fuel – This only needs to be set if the account number for the aircraft is different from that set at the Company EFB Preferences level. If a charge is made for delivering company fuel, type in the account number or name to use. Create a load on the EFB, select the NonRev load type, then Drop Company Fuel, and the quantity of fuel dropped. The account number will be entered on the DFR load.
- Account Number To Charge For RTS – This only needs to be set if the account number for the aircraft is different from that set at the Company EFB Preferences level. If a charge is made for return to service / operational check flights / maintenance flights, type in the account number or name to use. Create a load on the EFB, select the NonRev load type, then RTS / Maintenance and the minutes flown. The account number will be entered on the DFR load.
- Account Number To Charge For Training – This only needs to be set if the account number for the aircraft is different from that set at the Company EFB Preferences level. If a charge is made for training flights, type in the account number or name to use. Create a load on the EFB, select the NonRev load type, then Training / Proficiency, and the minutes flown. The account number will be entered on the DFR load.
- Account Number To Charge For Using Company Fuel – This only needs to be set if the account number for the aircraft is different from that set at the Company EFB Preferences level. If a charge is made for using company fuel, type in the account number or name to use. Create a load on the EFB, select the NonRev load type, then Use Company Fuel and the quantity of fuel used. The account number will be entered on the DFR load.
- Account Number To Charge For Weather – This only needs to be set if the account number for the aircraft is different from that set at the Company EFB Preferences level. If a charge is made for weather delays, type in the account number or name to use. Create a load on the EFB, select the NonRev load type, then WX, and the minutes flown. The account number will be entered on the DFR load.
- Rate To Use For 2nd Crew – This only needs to be set if the rate for the aircraft is different from that set at the Company EFB Preferences level. If a charge is made for a second crew member, enter the Rate Code to use. Create a load on the EFB, select the NonRev load type, then 2nd Crew. The Rate Code will be entered on the DFR load.
- Rate To Use For ATC Delay – This only needs to be set if the rate for the aircraft is different from that set at the Company EFB Preferences level. If a charge is made for ATC Delays, enter the Rate Code to use. Create a load on the EFB, select the NonRev load type, then ATC Delay and the minutes flown. The Rate Code will be entered on the DFR load.
- Rate To Use For Dropping Company Fuel – This only needs to be set if the rate for the aircraft is different from that set at the Company EFB Preferences level. If a charge is made for dropping company fuel, enter the Rate Code to use. Create a load on the EFB, select the NonRev load type, then ATC Delay and the quantity of fuel delivered. The Rate Code will be entered on the DFR load.
- Rate To Use For Positioning – This only needs to be set if the rate for the aircraft is different from that set at the Company EFB Preferences level. If a charge is made for positioning flights, enter the Rate Code to use. Create a load on the EFB, select the Non Revenue Items load type, then Positioning and the minutes flown. The Rate Code will be entered on the DFR load.
- Rate To Use For RTS – This only needs to be set if the rate for the aircraft is different from that set at the Company EFB Preferences level. If a charge is made for return to service / operational check flights / maintenance flights, enter the Rate Code to use. Create a load on the EFB, select the NonRev load type, then RTS / Maintenance and the minutes flown. The Rate Code will be entered on the DFR load.
- Rate To Use For Training – This only needs to be set if the rate for the aircraft is different from that set at the Company EFB Preferences level. If a charge is made for Training, enter the Rate Code to use. Create a load on the EFB, select the NonRev load type, then Training and the minutes flown. The Rate Code will be entered on the DFR load.
- Rate To Use For Using Company Fuel – This only needs to be set if the rate for the aircraft is different from that set at the Company EFB Preferences level. If a charge is made for using company fuel, enter the Rate Code to use. Create a load on the EFB, select the NonRev load type, then Use Company Fuel and the quantity used. The Rate Code will be entered on the DFR load.
- Rate To Use For WX Flying – This only needs to be set if the rate for the aircraft is different from that set at the Company EFB Preferences level. If a charge is made for weather delays, enter the Rate Code to use. Create a load on the EFB, select the NonRev load type, then WX and the minutes flown. The Rate Code will be entered on the DFR load.
Aircraft Flight Plan Preferences
- Flight Plan: Default Flight Rules – Set the default to VFR or IFR for the flight plan. The default can be changed before sending the flight plan.
- Flight Plan: Default Type Of Flight – Set the default to Scheduled, Non-Scheduled, General Aviation, or Other. The default can be changed before sending the flight plan.
- Flight Plan: Wake Turbulence Category – Set Light, Medium, or Heavy.
Aircraft Miscellaneous Preferences
- Additional Ground Time For Refueling – Enter the additional number of minutes required when refueling. This time will be added to the standard ground time.
- Automatic Approach Briefing – Set to On to enable automatic switching to the Arrival/Runway Chart tab. (Only available when v2Track is installed.)
- Caution If Last Operation At A Waypoint Exceeds This Period (days) – Turns the Last Operation banner on the Runway Chart page yellow after this period of days (defaults to 180 / 6 months) for that aircraft type only.
- Cruise Altitude System – Choose the cruise altitude system used for the altitudes automatically selected on the Nav page. If set, it supersedes the company EFB preference.
- Dangerous Goods List (comma separated list) – List the types of dangerous goods commonly carried. The list will appear when Dangerous Goods is selected as the Load Description, and the pilot will be given the opportunity to select from the list, manually enter, or cancel.
- Disable V2 Red Light Below This Speed – Set an airspeed (in knots) to disable the red message light on the v2Track cockpit control panel below a certain speed threshold.
- Ignore Runway/LZ Chart Changes Before This Date – Typically this should be set to the go-live date when first transitioning to FlightSpan managed Runway and LZ charts to avoid a long change history below each chart.
- Max Seats for Schedule – Set the maximum number of seats that are displayed on internal schedule and public calendar views. This does not prevent the flight coordinator from scheduling additional seats when creating the flight schedule.
- Prefilled Notam List (comma separated list) – Create a list of common hazard reports/NOTAMs that will be available to choose from when clicking the Report Issue / Hazard button on the runway chart pages. (96 character maximum)
- Record Fuel On Board at Enroute Waypoints? – When set to Yes, as you cross an en route waypoint, a prompt to enter fuel will pop up, prefilled with estimated fuel at the waypoint.
- Show Va Speed On MAP – When set to Yes, Maneuvering Speed will be displayed on the map tab. Va at various weights must be provided to FlightSpan Support to function.
- Trigger Auto Approach Briefing At (VSR) – Set the vertical speed required in feet per minute for when the Automatic Approach Briefing change to the Arrival/Runway Chart page should happen.
- Use v2 Tracker? – Set to Yes when FlightSpan is paired with v2Track.
- VSR Alert – Set to True if an alert is desired when vertical speed required to arrive at 1000 AGL one nautical mile from the destination meets a certain threshold.
- VSR Alert Threshold (fpm) – Set the vertical speed required threshold in feet per minute for the vertical speed alert.
Aircraft Performance (Takeoff and Landing) Preferences
- Additional Flap Setting Allowed For Landing 1 (degrees) – first additional flap setting for landing performance (contact FlightSpan support to configure)
- Additional Flap Setting Allowed For Landing 2 (degrees) – second additional flap setting for landing performance (contact FlightSpan support to configure)
- Additional Flap Setting Allowed For Landing 3 (degrees) – third additional flap setting for landing performance (contact FlightSpan support to configure)
- Additional Flap Setting Allowed For Takeoff 1 (degrees) – If more than one flap setting is authorized for takeoff, set the second configuration here. The option will be added to the Takeoff Performance page.
- Additional Flap Setting Allowed For Takeoff 2 (degrees) – If more than two flap settings are authorized for takeoff, set the third configuration here. The option will be added to the Takeoff Performance page.
- Additional Flap Setting Allowed For Takeoff 3 (degrees) – If more than three flap settings are authorized for takeoff, set the fourth configuration here. The option will be added to the Takeoff Performance page.
- Auto Headwind/Tailwind Mode – When set to Yes, when FlightSpan senses you are on approach and below the speed threshold, it auto sequences to the Headwind or Tailwind Component tab.
- Calibrated Airspeed Adjustment (knots) – Set the Calibrated Airspeed correction at the typical approach speed. This adjustment will be used in the Headwind/Tailwind display.
- Custom Landing Performance Adjustment (%) – adjusts the estimated landing roll by this percentage. For example to increase landing roll by 20%, set to “20”.
- Custom Takeoff Performance Adjustment (%) – adjusts the estimated takeoff roll by this percentage. For example to increase takeoff roll by 20%, set to “20”.
- Custom Takeoff Performance Marker At This Percent Of Takeoff Roll – If you wish to have an additional performance checkpoint on the takeoff roll, set the percent of the takeoff roll where the marker should appear.
- Custom Takeoff Performance Marker Label – Set the label for the custom performance marker.
- Default Flap Setting For Landing (degrees) – Set the normal landing flap configuration here which will be used for Landing Performance calculations.
- Default Flap Setting For Takeoff (degrees) – Set the normal takeoff flap configuration here which will be used for Takeoff Performance calculations.
- Displace Threshold For Landing (meters) – Set the standard displaced threshold (your normal planned touchdown distance from the runway threshold) and the amount will be added to the landing roll to calculate the stopping point.
- Display Extra Set Of Approach Speeds – Set to Yes if you want an extra approach speed to be displayed (for example -10 knots for short field).
- Display Extra Set Of Rotation Speeds – If you want an extra rotation speed to be displayed (for example – 5 knots for short field).
- Extra Approach Speed Difference From Normal Approach Speed (in KIAS) – If you want an extra approach speed to be displayed (for example -10 knots for short field) set the speed difference here.
- Extra Approach Speed Label – (not yet implemented) Set the label you wish to appear next to the extra approach speed (for example Short Field).
- Extra Rotation Speed Difference From Normal Rotation Speed (in KIAS) – If you want an extra rotation speed to be displayed (for example – 5 knots for short field) set the speed difference here.
- Extra Rotation Speed Label – (not yet implemented) Set the label you wish to appear next to the extra rotation speed (for example Short Field).
- Headwind/Tailwind Mode Speed Threshold – Set the speed (in knots) at which you want the Headwind/Tailwind tab to automatically open.
- ISA To Use For Override (Takeoff/Landing Performance) – the default temperature used for performance calculations is from an online source. If you do not wish to use the online source, set the default temperature (degrees C) to be used for performance calculations.
- Landing Max Runway Usable (%) – Set the runway redline (latest planned stopping point) here as a percentage of total runway length.
- Landing Max Runway Usable Applies To – If set to full length, the redline will always be a percentage of the total runway length. If set to available runway, any displaced threshold will first be subtracted, then the percentage applied. (The redline will be farther down the runway when set to available runway.)
- Landing Performance Conditions Text – Add a label to the landing performance page specifying the conditions, for example, “No Reverse”
- Max Downslope For Landing (%) – Set the maximum allowable downslope for landing.
- Max Upslope For Takeoff (%) – Set the maximum allowable upslope for landing.
- Maximum Vref: – Defines the maximum Vref a pilot can select on the Headwind/Tailwind tab
- Minimum Vref: – Defines the minimum Vref a pilot can select on the Headwind/Tailwind tab.
- Override Qnh and OAT For Takeoff/Landing Performance – The default pressure and temperature used for performance calculations are from an online source. If you do not wish to use the online source, set to Yes. (Qnh To Use For Override (Takeoff/Landing Performance) must also be set to Yes.)
- Qnh To Use For Override (Takeoff/Landing Performance) – The default Qnh used for performance calculations is from an online source. If you do not wish to use the online source, set the default Qnh to be used for performance calculations. (Override Qnh and OAT For Takeoff/Landing Performance must be set to Yes.)
- Show Rotation Speeds For Takeoff – Set to Yes to display Vr and to enable the 50% of takeoff roll performance marker on the takeoff performance page.
- Show Vg Speed For Takeoff – Display Best Glide on the Takeoff Performance tab. NOTE: you must provide FlightSpan Support with this speed for your aircraft type, and if you want it to be reduced for weights below max takeoff weight, please provide documentation/charts that define the speed at lower weights.
- Show Vx Speed For Takeoff- Display Vx on the Takeoff Performance tab. NOTE: you must provide FlightSpan Support with this speed for your aircraft type, and if you want it to be reduced for weights below max takeoff weight, please provide documentation/charts that define the speed at lower weights.
- Show Vy Speed For Takeoff- Display Vy on the Takeoff Performance tab. NOTE: you must provide FlightSpan Support with this speed for your aircraft type, and if you want it to be reduced for weights below max takeoff weight, please provide documentation/charts that define the speed at lower weights.
- Takeoff Max Runway Usable (%) – Set the runway redline (latest planned liftoff point) as a percentage of runway length.
- Takeoff Max Runway Usable % Applies To – If set to Available Runway, the percentage will be applied to the runway available prior to the latest obstacle clearance point if one has been set. If set to Full Length, the obstacle clearance point will not be factored in the calculation. (This could result in the takeoff redline being marked after the latest point at which the aircraft must be airborne to safely clear obstacles.)
- Takeoff Performance Conditions Text – Add a label to the landing performance page specifying the conditions, for example, “Inlet Bypass”
- Takeoff Rotation Speed At Max Takeoff Weight – Set Vr at maximum takeoff weight.
- Takeoff Rotation Speed Factor (knots per kg below MTOW) – Set the speed correction factor for takeoff at lighter gross weights.
- Takeoff Turn Around Margin (m) – Set the amount of runway required for turning around and lining up on the runway. This number will be added to the takeoff roll to calculate the estimated liftoff point.
- Vref At Max Takeoff Weight – Set Vref at the maximum takeoff weight. Primarily used for landing, but it is needed at the max takeoff weight for accelerate/stop calculations. Also needed if you choose to land at a weight higher than the maximum landing weight.
- Vref Factor (knots per kg below MTOW) – Set the speed correction factor for approach at lighter gross weights.
- Warn If Aircraft Not Specifically Approved For Runways Shorter Than This Length (m) – Set the minimum runway length for the aircraft type. Any runways without the aircraft specifically approved, or for runways set to “No” for that aircraft will receive a warning on the takeoff and landing performance tabs.
Aircraft Performance (Cruise) Preferences
- Always Climb To Next Altitude If Fuel Saved More Than (kg) – Set the amount of fuel savings that will result in FlightSpan selecting a higher altitude even if it requires more time.
- Cap Recommended Cruise Altitude – Set the maximum altitude that FlightSpan will automatically select.
- Climb To Next Altitude If Added Time Less Than (hrs) – Set the time threshold at which FlightSpan should select the next altitude for better fuel efficiency.
- Climb To Next Altitude If Fuel Saved More Than (kg) – Set the fuel threshold at which FlightSpan should select the next altitude if the increase in flight time is less than the Climb To Next Altitude If Added Time Less Than setting.
- Company Fuel Reserve 1 (in aircraft fuel units) – Set the standard fuel reserve level here, for example 450 liters.
- Company Fuel Reserve 2 (in aircraft fuel units) – Set the minimum fuel reserve here, for example 350 liters.
- Max Altitude With Supplemental O2 – Set the maximum altitude for unpressurized aircraft to operate at. Most canulas limit you to FL18.
- Max Operating Altitude (company limit) – Set the company maximum operating altitude if it is less than the certified Max Operating Altitude; typically should be set to the maximum non-O2 altitude for passengers.
- Max Time Added To Climb Next Altitude (hrs) – Set the maximum time to climb for selecting the most efficient cruise altitude; won’t select the next higher altitude/FL if the time to climb to that altitude exceeds this number.
- Nominal Cruise Fuel Burn (kg/hr) – Set the fuel burn for calculating the reserve fuel at an unknown altitude. This is used for calculating reserve flight time at the bottom of the nav grid, to estimate aircraft weight to compute Va on the MAP tab, and to calculate fuel burn when ETE is manually adjusted on A-A legs.
- Nominal Cruise Speed (KTAS) – Set the cruise speed for calculating cruise at an unknown altitude. This is used for calculating time to an alternate and for calculating reserve time.
- Optimum Flight Time Altitude Label – Set the label you wish to appear on the altitude pick list for the least total time en route. The default label is “No Time Penalty”.
- Optimum Fuel Burn Altitude Label – Set the label you wish to appear on the altitude pick list for the least total fuel burn. The default label is “Least Fuel Burn”.
- Pattern Fuel Burn (kg) – Set the fuel required for one circuit in the traffic pattern.
- Reduce Climb Fuel, Time and Distance by 15% Away From Home Base – Set to Yes if you want FlightSpan to calculate better climb performance when away from home base due to typically lighter loads.
- Reduce Start/Taxi Fuel Burn Away From Home Base By (kg) – If you want start/taxi fuel burn to be less when away from home base (typically used because of minimal taxi requirements) set the amount of reduction using kilograms, regardless of aircraft fuel units.
- Reserve Fuel for Schedule (in aircraft fuel units) – If you wish the flight coordinator to use a different reserve fuel level other than Reserve Level 1 when planning payload, set the level here.
- Speed Reduction Option (for doors removed etc.) – When set to Yes, a Reduce Speed button will be added to the weight and balance Tab which can be used to manually set a cruise speed, and when a helicopter is operating with an external load, speed will automatically be reduced by the amount in the Speed Reduction Option Cruise Speed preference.
- Speed Reduction Option Cruise Speed (knots) – For helicopters, set the default speed for operating with an external load, and for Fixed-Wing, set the default reduced cruise speed.
- Traffic Pattern Flight Time (minutes) – Set the time required for one circuit in the traffic pattern.
Aircraft Weight and Balance Preferences
- Allow Cargo In Seat Positions – When set to yes, cargo can be loaded in any seat position.
- Aux Tanks Defaulted To Always Be Installed (comma separated list) – Aux tanks are numbered 1, 2, 3, 4. Numbers are associated with specific aux tanks by FlightSpan Support.
- CG Units – Choose between meters, millimeters, feet, or inches.
- Compute Payload From – Choose between Max Ramp Weight and Max Takeoff Weight. NOTE: Payload will be calculated from Max Ramp Weight if you retain the default setting. If your Departure Taxi Fuel burn set in the Aircraft Performance table is less than the difference between Max Takeoff Weight and Max Ramp Weight, then your payload will be limited to Max Takeoff Weight + Departure Taxi Fuel weight so that Max Takeoff Weight is not exceeded.
- Copilot Seat Arm (m) – If you have set the Removable Copilot Seat preference to Yes, then set the seat arm. Set the arm in meters even if the aircraft uses different units.
- Copilot Seat Lateral Arm (m) – If you have set the Removable Copilot Seat preference to Yes, then set the lateral arm for helicopters. Set the arm in meters even if the aircraft uses different units.
- Copilot Seat Weight (kg) – If you have set the Removable Copilot Seat preference to Yes, then set the seat weight. Set the weight in kilograms even if the aircraft uses different units.
- Default Departure Fuel (in aircraft fuel units) – Set the minimum default fuel quantity to be used for initial flight planning.
- Default Load Station 1 – Set the arm for the front load button on the weight and balance tab. The arm can be changed for any given flight. Set the arm in meters even if the aircraft uses different units.
- Default Load Station 2 – Set the arm for the middle load button on the weight and balance tab. The arm can be changed for any given flight. Set the arm in meters even if the aircraft uses different units.
- Default Load Station 3 – Set the arm for the aft load button on the weight and balance tab. The arm can be changed for any given flight. Set the arm in meters even if the aircraft uses different units.
- Default Seats In Tail Configuration – Set how many seats you want installed in the aft seat stowage compartment by default when initially creating a new flight.
- Default Underwing Pods Position – If your aircraft is equipped with underwing cargo pods, set to On for the weight and balance page to open with the pods installed.
- Default Passenger Weight (in aircraft weight units) – set the default passenger weight if the aircraft weight units are different from the company weight units. If you wish to have 3 seats installed in the tail, at least 3 seats must be removed on the Initial Seat Configuration preference. Enter a zero for every installable seat, and a 1 for every seat you wish to be in the aft compartment. For example on a nine seat aircraft with 3 of the installable seats stowed in the aft compartment, enter 00000000-111.
- Default What/Where Number – Set the default arm for the button used to calculate how much loading can go at a given station without exceeding weight or balance limitations.
- Fill Seats In This Order (comma separated list of seat numbers) – The default fill order is front to back, left to right. The front left passenger seat is number one, front center number 2, right center number 3, second row left number 4, and so on. Change the number order to change the fill order.
- Fuel Units – Select the fuel units used for displaying fuel quantity on the Nav and Weight and Balance tabs.
- Has Aft Load Compartment – Set by FlightSpan Support for the aircraft model.
- Include Copilot Seat In Autofill Features – Set to Yes if a passenger can occupy the copilot seat; set to No if the first seat to be filled is in the front passenger row.
- Initial Seat Configuration – Set a one for each seat you wish to be installed and a zero for each uninstalled seat when first opening the weight and balance page. Seat order begins with the first passenger seat row and is front to back, left to right. For example, if you want your initial configuration to be right hand seats only, set to 01010101. If you want any of the uninstalled seats to be stowed in the aft compartment by default, set the Default Seats In Tail Configuration preference.
- Max Aft Load Station (meters) – Set the aftmost arm at which cargo can be loaded. Set the arm in meters even if the aircraft uses different units.
- Max Forward Load Station (meters) – Set the frontmost arm at which cargo can be loaded. Set the arm in meters even if the aircraft uses different units.
- Max Number of Seats Installable In Cabin – Set the maximum number of seats that can be installed in the cabin.
- Max Number of Seats Stowable Aft – Set the maximum number of seats that can be stowed in the aft compartment.
- Pilot Seat Arm (meters) – Set the average pilot seat arm. Set the arm in meters even if the aircraft uses different units.
- Prompt for Cargo when entering Passengers? – Set to Yes for the cargo entry screen to open after entering passengers when creating a load on the DFR.
- Quick Configure Seats 0 – Set a one for each seat you wish to be installed and a zero for each uninstalled seat for the top quick configure button on the weight and balance page. Seat order begins with row two and is front to back, left to right. For example if you want all eight seats installed, set to 11111111. If you wish the graphic to be changed accordingly, contact FlightSpan Support.
- Quick Configure Seats 1 – Set a one for each seat you wish to be installed and a zero for each uninstalled seat for the second quick configure button on the weight and balance page. Seat order begins with row two and is front to back, left to right. For example, if you want your configuration to be right hand seats only, set to 01010101. If you wish the graphic to be changed accordingly, contact FlightSpan Support.
- Quick Configure Seats 2 – Set a one for each seat you wish to be installed and a zero for each uninstalled seat for the third quick configure button on the weight and balance page. Seat order begins with row two and is front to back, left to right. For example, if you want your configuration to be left hand seats only, set to 10101010. If you wish the graphic to be changed accordingly, contact FlightSpan Support.
- Quick Configure Seats 3 – Set a one for each seat you wish to be installed and a zero for each uninstalled seat for the fourth quick configure button on the weight and balance page. Seat order begins with row two and is front to back, left to right. For example, if you want your configuration to be no seats, set to 0000000. If you wish the graphic to be changed accordingly, contact FlightSpan Support.If you wish the graphic to be changed accordingly, contact FlightSpan Support.
- Quick Configure Seats Stretcher – Set a one for each seat you wish to be installed and a zero for each uninstalled seat for how seats are configured in the cabin when the Stretcher Quick Configure icon is tapped on the W&B tab. For example, if the stretcher is on the right, and you want just the left passenger seats installed in rows one and two, set to 10100000.
- Removable Copilot Seat – Set to Yes if the copilot seat is removable.
- Standard Crew Weight (kg) – Set a standard crew weight in kilograms for use in calculating the payload in FlightSpan Ops when the crew has not yet been assigned to a flight.
- Stretcher Arm (m) – Set the arm of an installed stretcher. Set the arm in meters even if the aircraft uses different units.
- Stretcher Lateral Arm (m) – For helicopters, set the lateral arm of an installed stretcher. Set the arm in meters even if the aircraft uses different units.
- Stretcher Replaces These Seats (comma separated list) – Add the seat numbers that must be removed when the stretcher is installed. Seat order begins with the first passenger row and is front to back, left to right. For example, if the stretcher replaces the front three seats on the right side, enter 2,4,6.
- Stretcher Weight (kg) – Set the stretcher weight in kilograms even if the aircraft uses different units.
- Underwing Pod Arm (meters) – Enter the arm of the center of gravity of the installed, empty pod. Set the arm in meters even if the aircraft uses different units.
- Underwing Pod Empty Weight (kg) – Enter the weight of the empty pod. Set the weight in kilograms even if the aircraft uses different units.
- Underwing Tank Arm (meters) – Enter the arm of the center of gravity of the installed, empty tank. Set the arm in meters even if the aircraft uses different units.
- Underwing Tank Capacity (liters) – Enter the capacity of the underwing tank. Set the capacity in liters even if the aircraft uses different units.
- Underwing Tank Empty Weight (kg) – Enter the empty weight of the underwing tank. Set the weight in kilograms even if the aircraft uses different units.
- Weight Units – Select the units (kilograms or pounds) to use for W&B functions on the EFB.
FlightSpan Ops Settings
The following EFB Preferences also are used as FlightSpan Ops settings.
FSO Company EFB Preferences
- DFR: Record Block Time
- DFR: ATD/ATA Time Format
- GMT Offset
FSO Aircraft Type EFB Preferences
- Company Fuel Reserve 1 (in aircraft fuel units)
- Company Fuel Reserve 2 (in aircraft fuel units)
- Compute Payload From
- Default Duty Time Before Departure
- Default Duty Time After Arrival
- Include Copilot Seat In Autofill Features
- Max Number of Seats Installable In Cabin
- Max Seats for Schedule
- Nominal Cruise Fuel Burn (kg/hr)
- Nominal Cruise Speed (KTAS)
- Reduce Climb Fuel, Time and Distance by 15% Away From Home Base
- Reduce Start/Taxi Fuel Burn Away From Home Base By (kg)
- Reserve Fuel for Schedule (in aircraft fuel units)
- Standard Crew Weight (kg)
- Traffic Pattern Flight Time (minutes)
iPad EFB Preferences
Some Company and Aircraft Type EFB Preferences can be changed at the individual iPad level. See the Settings documentation for details.