
In this lesson, you will learn how to interpret the results of your performance calculations.
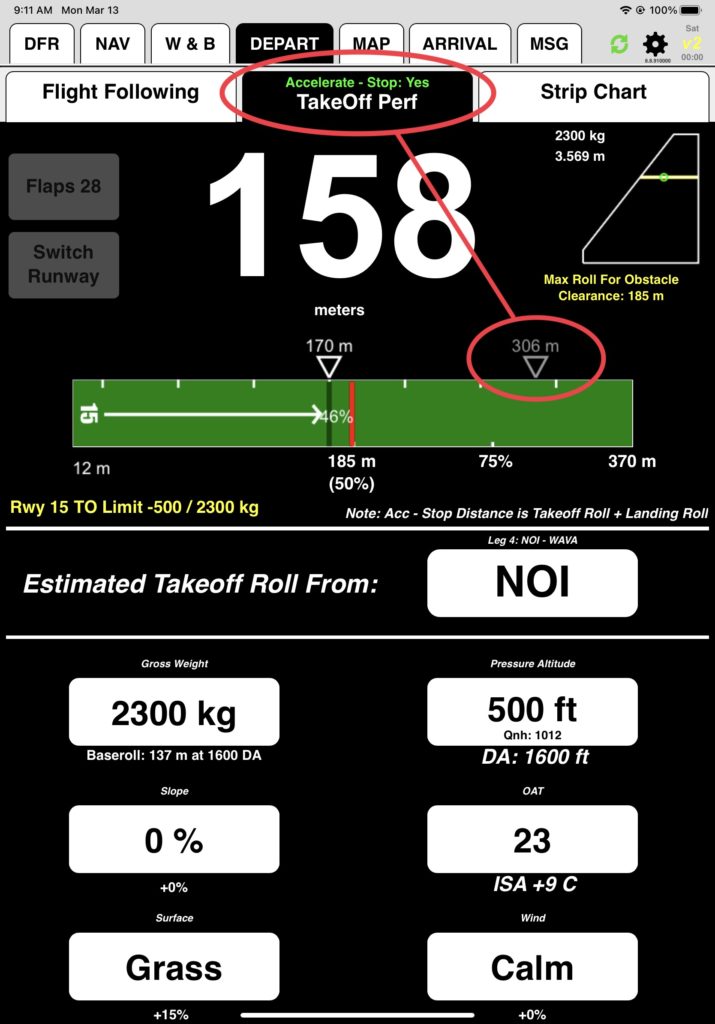
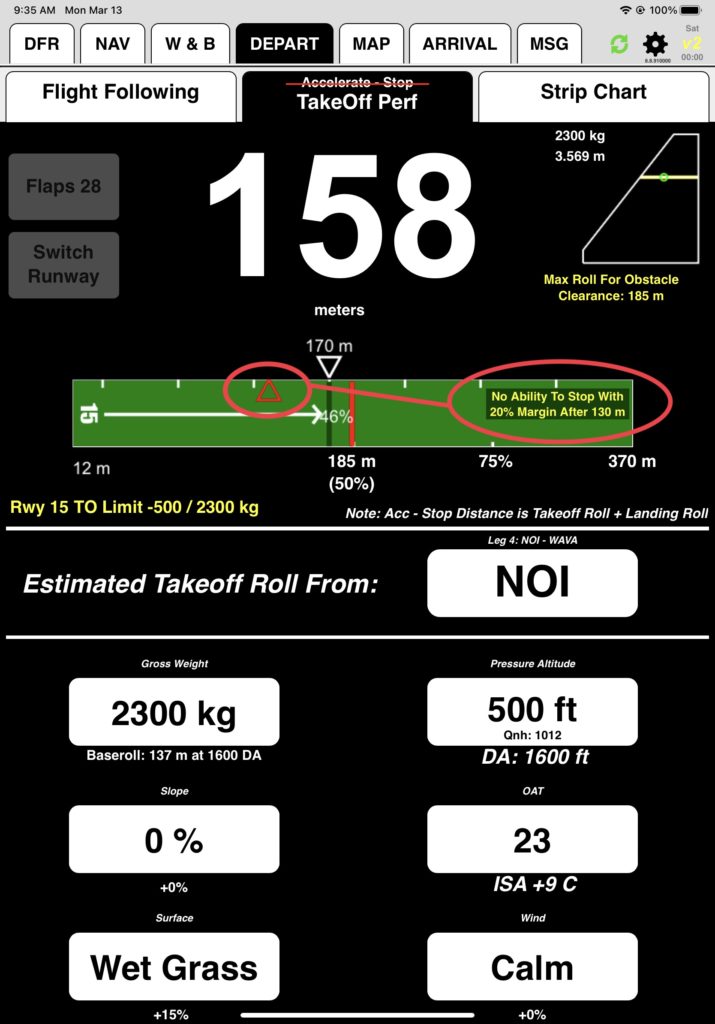
Calculated takeoff roll at NOI under these conditions is 158 meters. FlightSpan™ calculates takeoff roll and adds the runway lost in the turnaround (your company sets the value in FlightSpan™ Ops for each aircraft type, in this case 12 meters) to calculate the liftoff point. The liftoff point at NOI is expected at 158 + 12 = 170 meters. It is indicated by a white triangle, a green line across the runway, and the percentage of runway expected to be used.

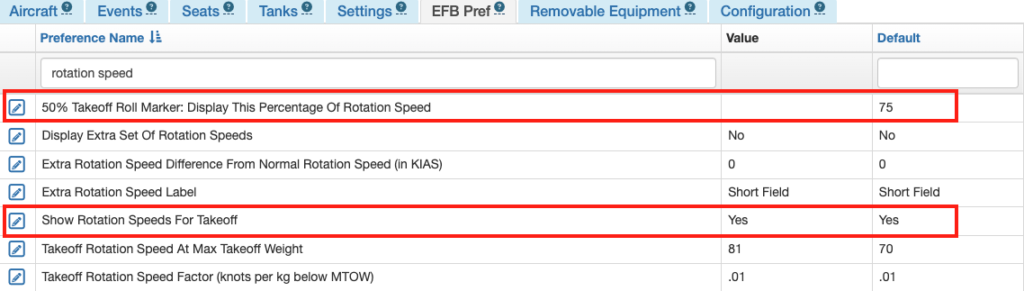
An optional performance checkpoint as a percentage of Vr can be displayed with a green triangle. The default is 75% of Vr at 50% of the takeoff roll.
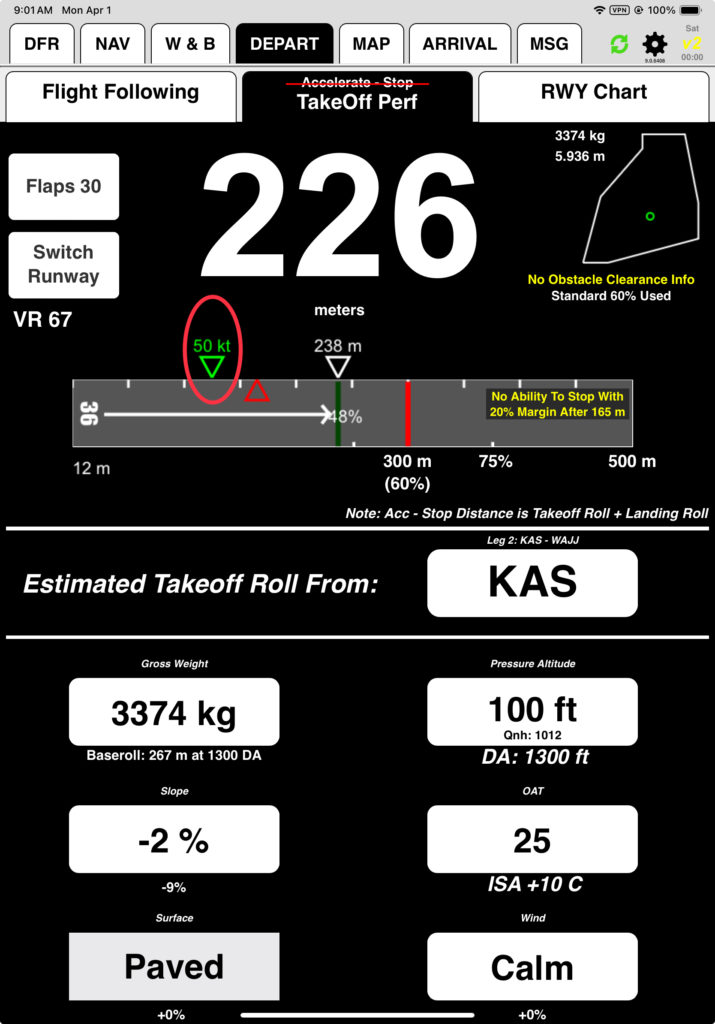
The performance checkpoint can be enabled by setting the Aircraft Type EFB Preference Show Rotation Speeds For Takeoff to Yes, and the default percentage of Vr can be changed with the 50% Takeoff Roll Marker: Display This Percentage Of Rotation Speed Preference.
Note that you have a green ‘Accelerate – Stop: Yes’ notification at the top of the TakeOff Perf tab. In the background, FlightSpan™ calculated a landing roll of 136 meters at 2300 kilograms, added that to the takeoff roll to get the Accelerate – Stop distance, then added the 12 meters lost in the turnaround to get a stopping point of 306 meters. If conditions were exactly as planned and you did everything just right, you could abort at takeoff speed and expect to get stopped at the gray triangle.
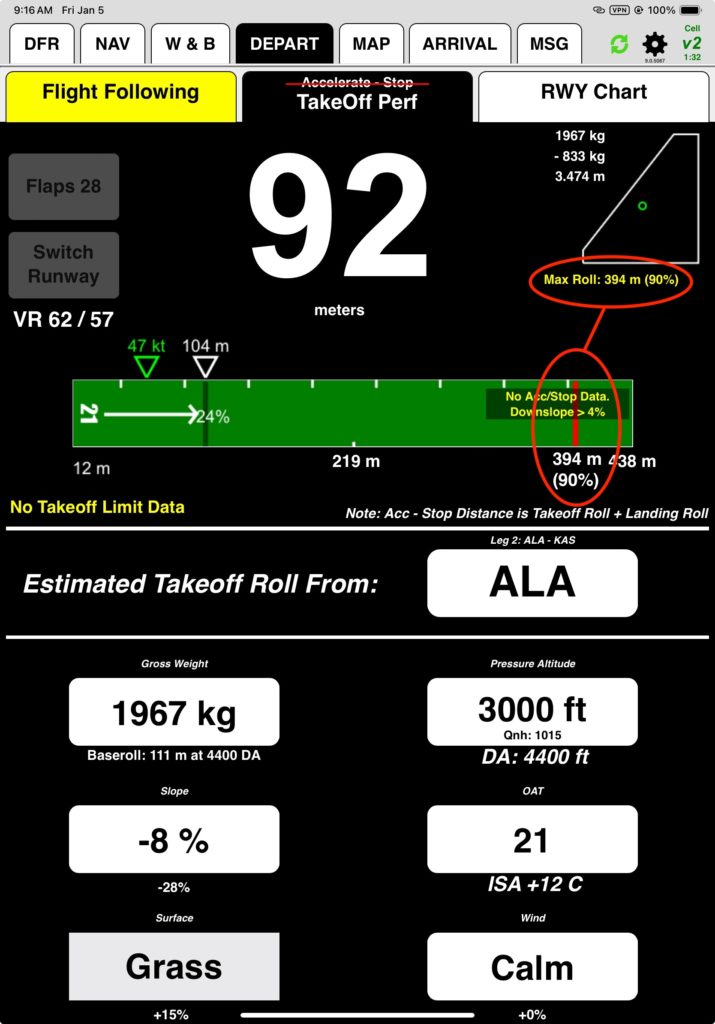
You’ll get an accelerate/stop warning if the accelerate-stop distance x 1.2 + runway lost in the turnaround is greater than the runway length. (20% is added since things are rarely exactly as planned and pilots need time to react.) To see what it looks like, change to Wet Grass.
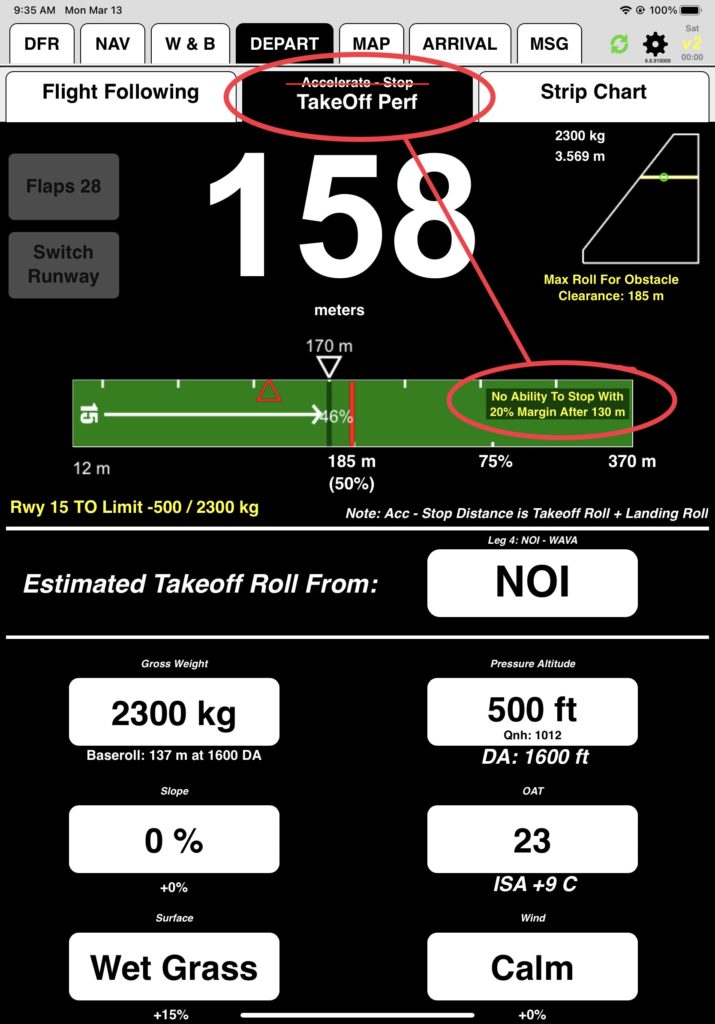
FlightSpan™ does speed-distance calculations in the background to determine an abort point and speed that allows you to stop on the runway with a 20% margin built in, and marks it with a red triangle (in this case, 130 meters).
Redline on the runway is the latest liftoff point allowed for the runway based on the value set in FlightSpan™ Ops. It may be defined by a percentage of the runway (e.g. 75%) or for specific runways it may be changed due to climb requirements or other factors.
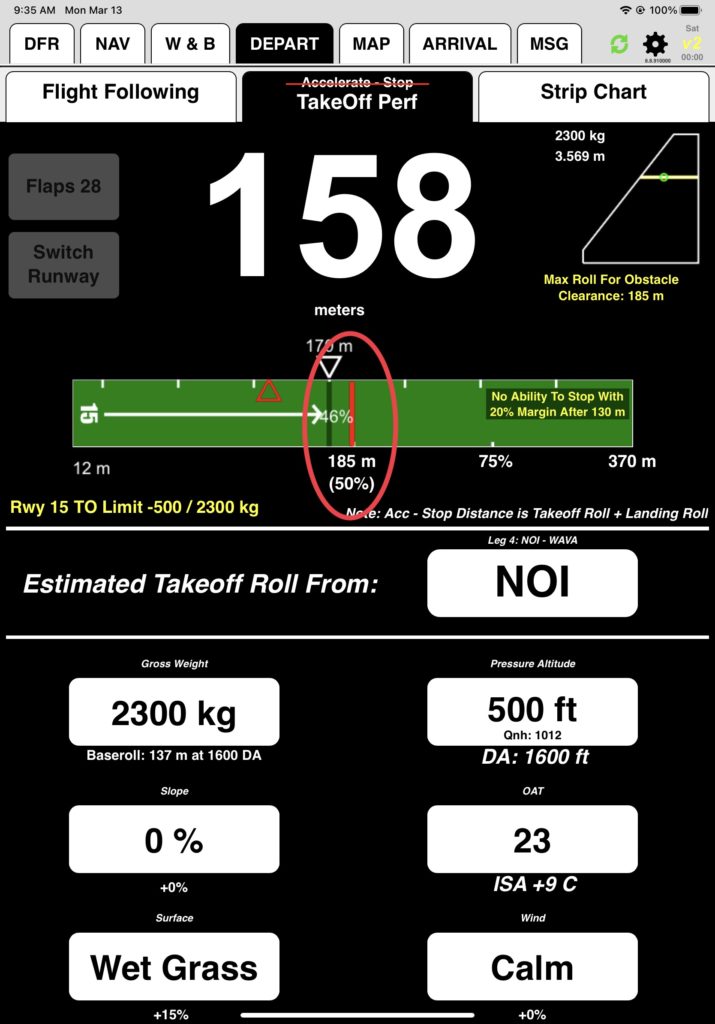
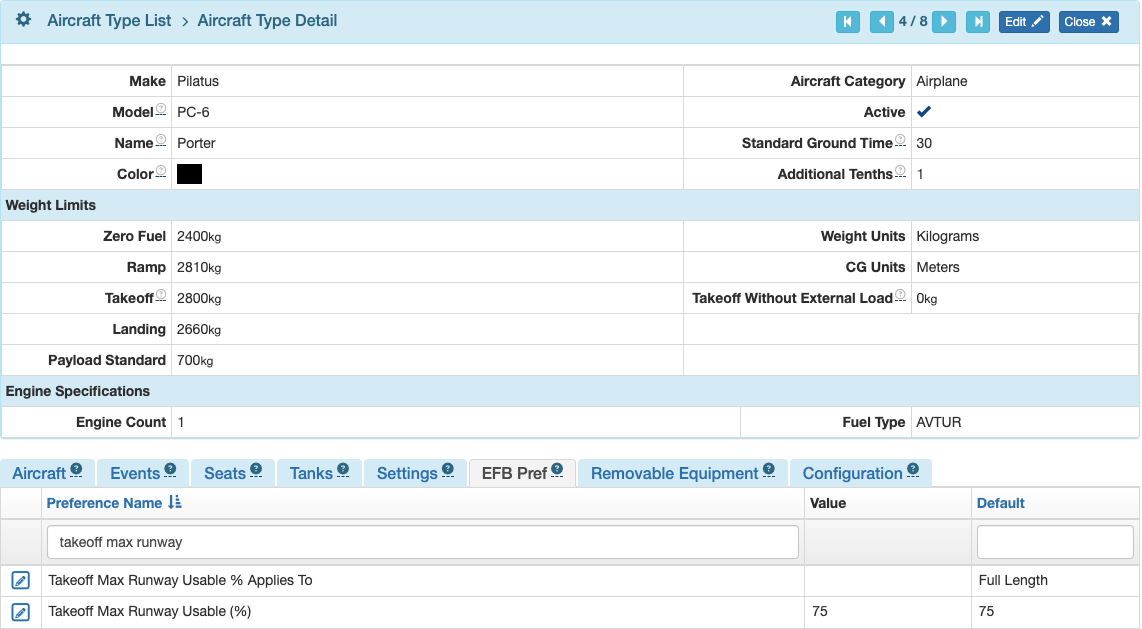
The standard redline is set using the Aircraft EFB Preference Takeoff Max Runway Usable (%).
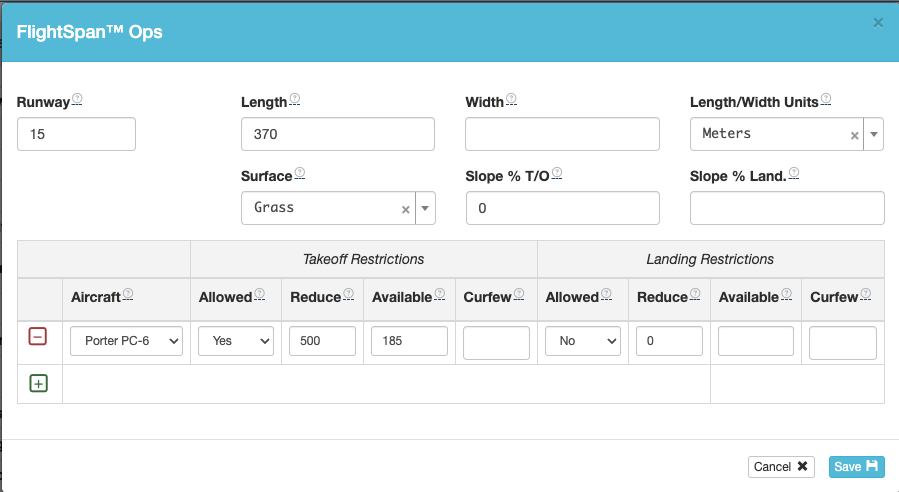
Runway specific redlines are set in the runway’s “Available” setting under Takeoff Restrictions.
- If no available length is set then Takeoff Max Runway Usable is used for the redline.
- If a runway has available length set to less than Takeoff Max Runway Usable, then the shorter length is used for the redline.
The Company EFB Preference Limit Takeoff Available Runway Length To Max Runway Usable Setting can be set to “Yes” or “No”.
When set to the default of “Yes”
- If a runway has available length set to more than the Takeoff Max Runway Usable, then the greater length is ignored and Takeoff Max Runway Usable is used for the redline. There will also be a notation that there is an obstacle clearance point defined after the redline.
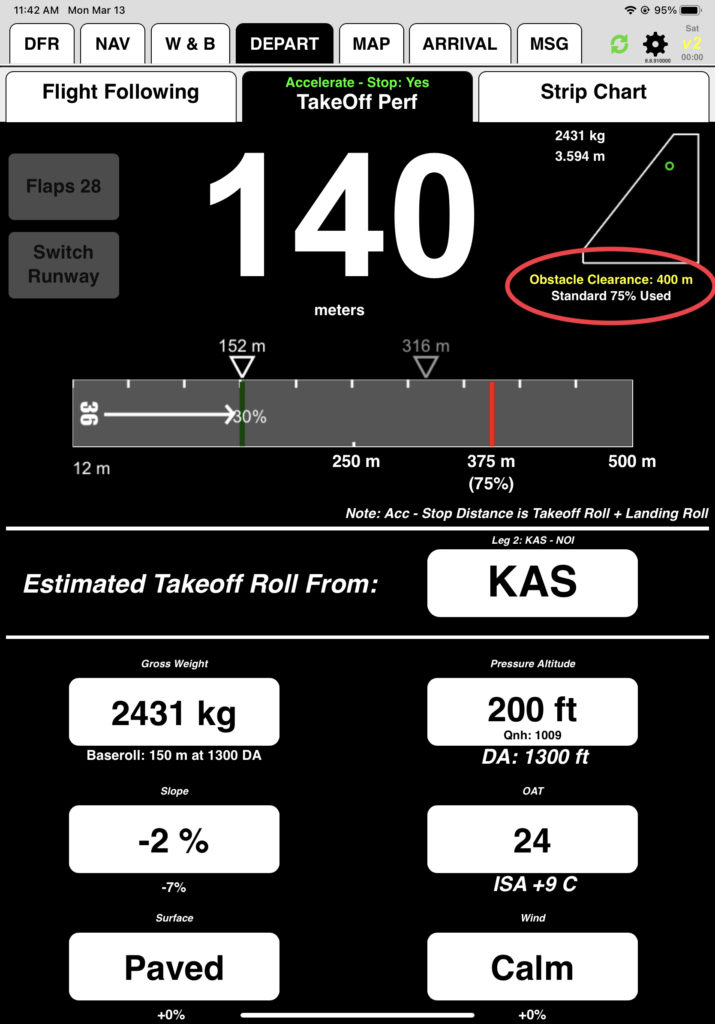
When set to “No”:
- If a runway has available length set to more than the Takeoff Max Runway Usable, then the greater length is used for the redline.
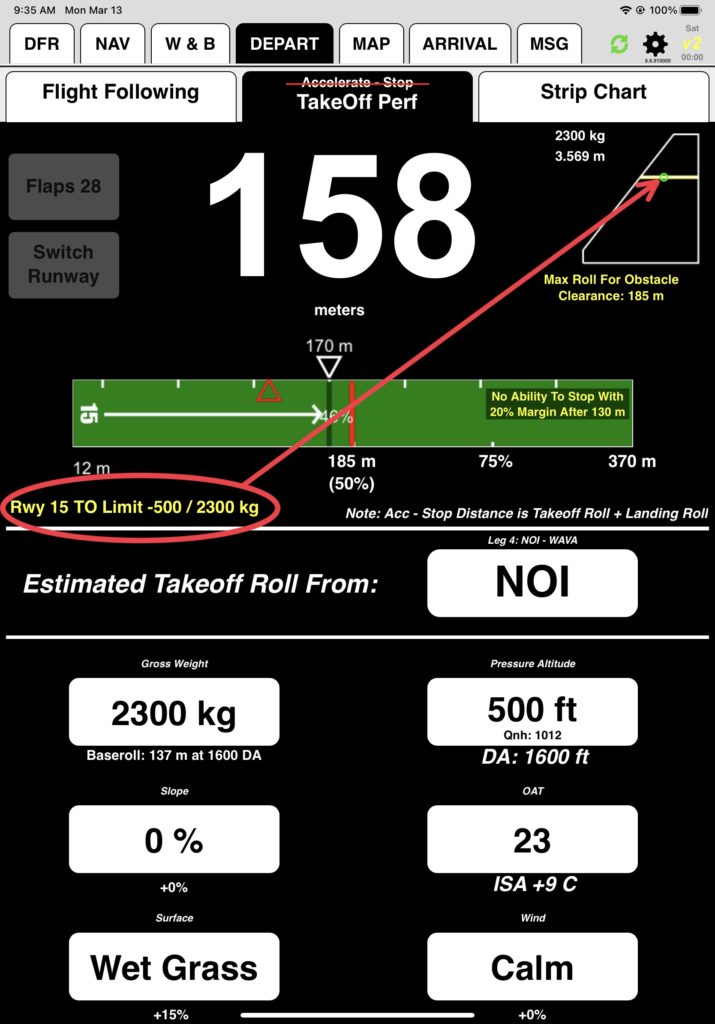
At NOI you have to be airborne by 185 meters to safely clear the obstacles, which is also indicated by a note that appears any time there is an obstacle clearance requirement.

The Switch Runway button allows you to change runways if there is more than one option available. At NOI it is grayed out, since it is a one-way runway.

Note: If you change to the opposite runway, it will still display left to right.
The Flaps button allows you to change flap settings, and FlightSpan™ will recalculate the takeoff roll accordingly. On the PC6 it is grayed out since there is only one approved takeoff flap setting.
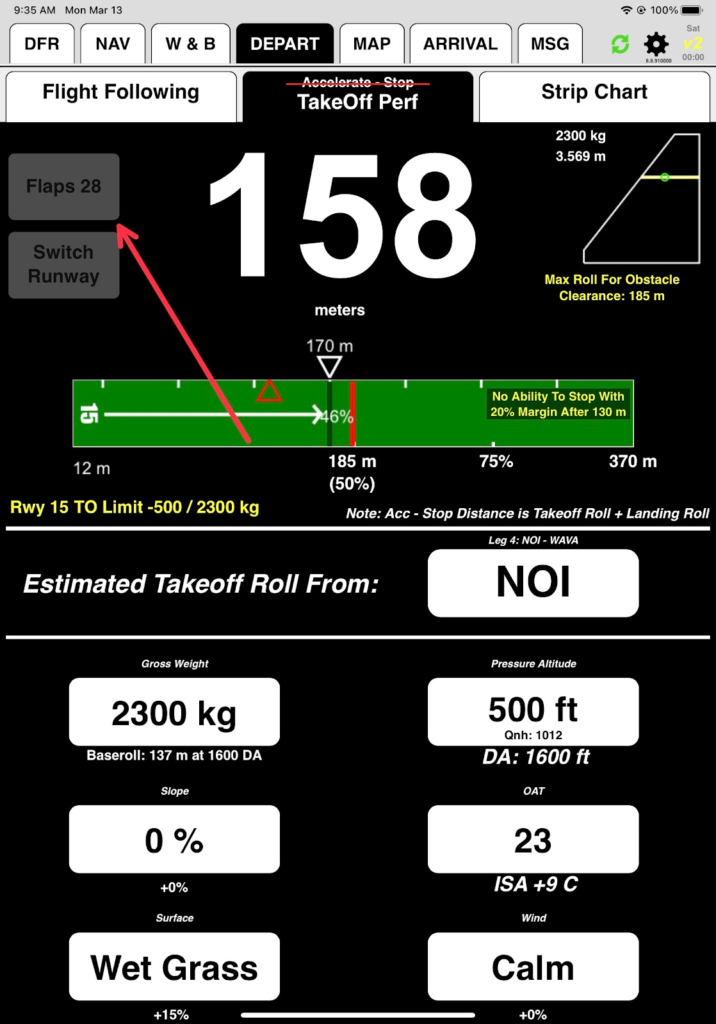
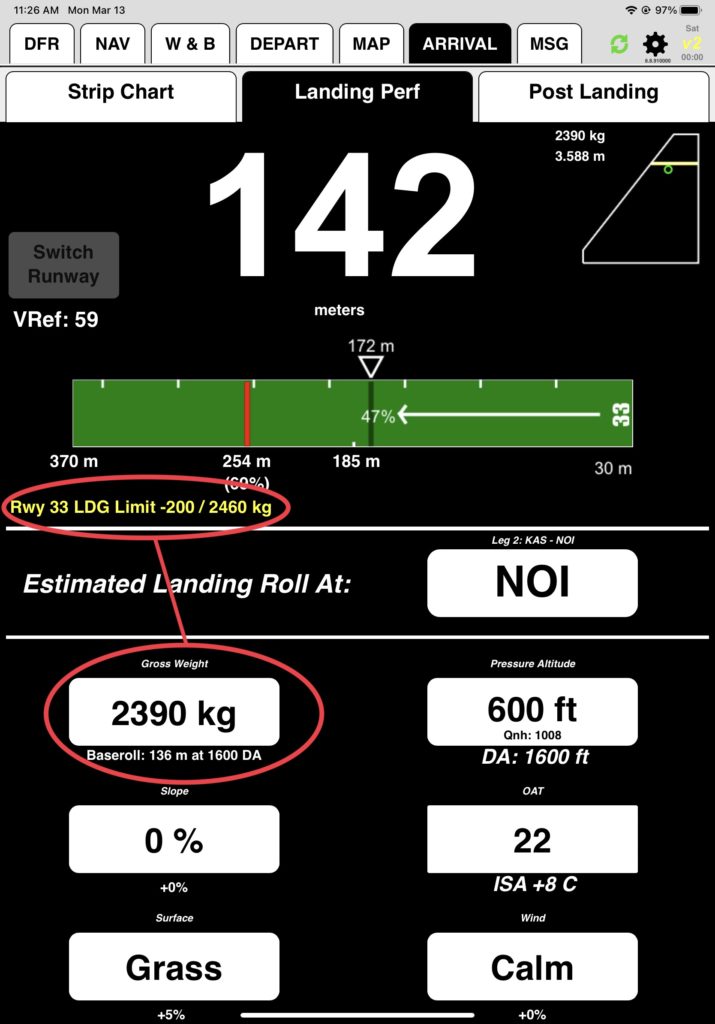
If there is a runway takeoff weight limit, it will be displayed on the left, along with a yellow line on the CG envelope. Current weight and CG are also displayed on the envelope. At NOI you are limited to a gross weight of 2300 kilograms.
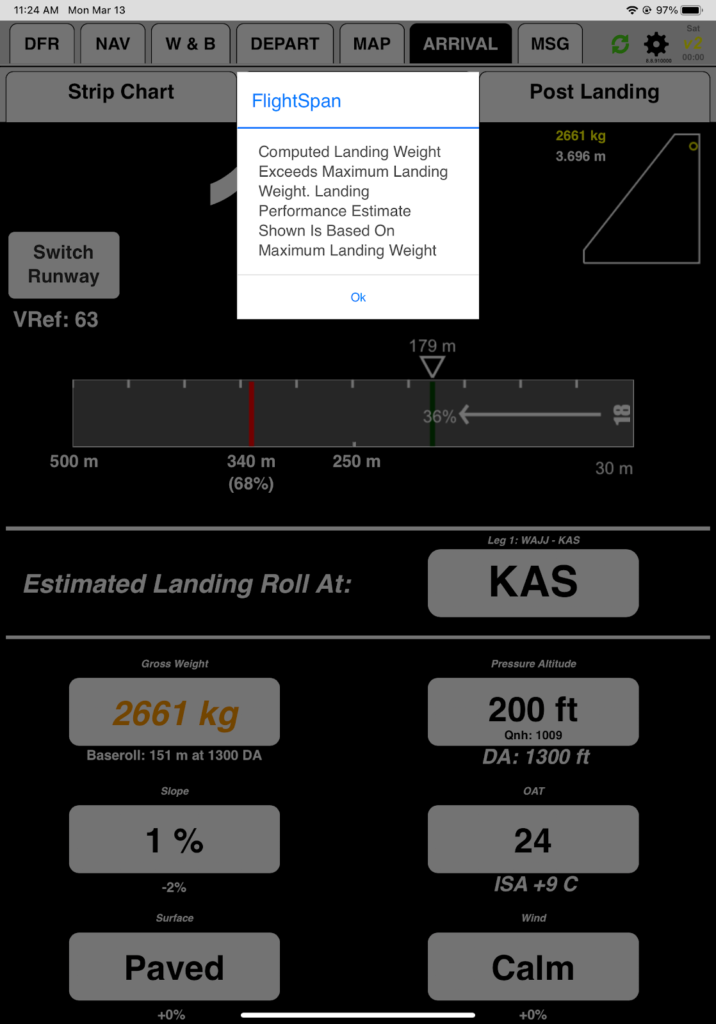
Now switch to the ARRIVAL/Landing Perf tab. FlightSpan™ again defaults to the first incomplete leg of your flight. On this flight you’ll get a warning message since your planned landing weight is over the limit by 2 kilograms.
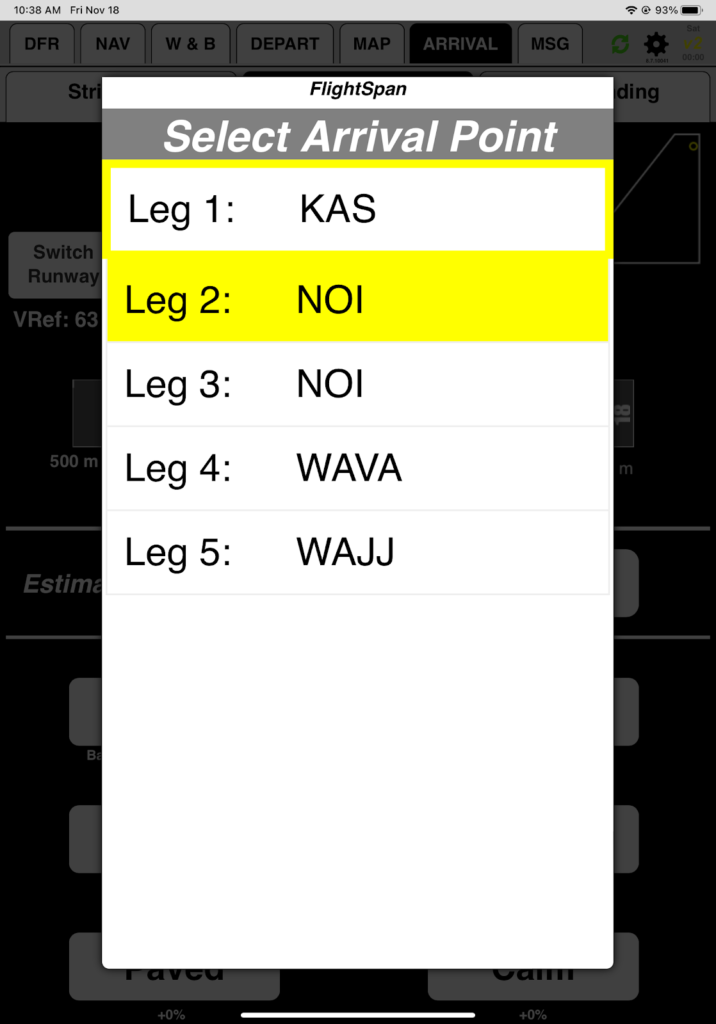
Change airports as you did before. Be sure to pick Leg 2: NOI, since that is the leg which you expect to arrive at NOI carrying a load.
FlightSpan™ again defaults to the most advantageous runway, in this case Runway 33 since it is the only available landing runway.
Landings are always displayed right to left.
Landing performance factors are handled in the same way as the takeoff performance factors.
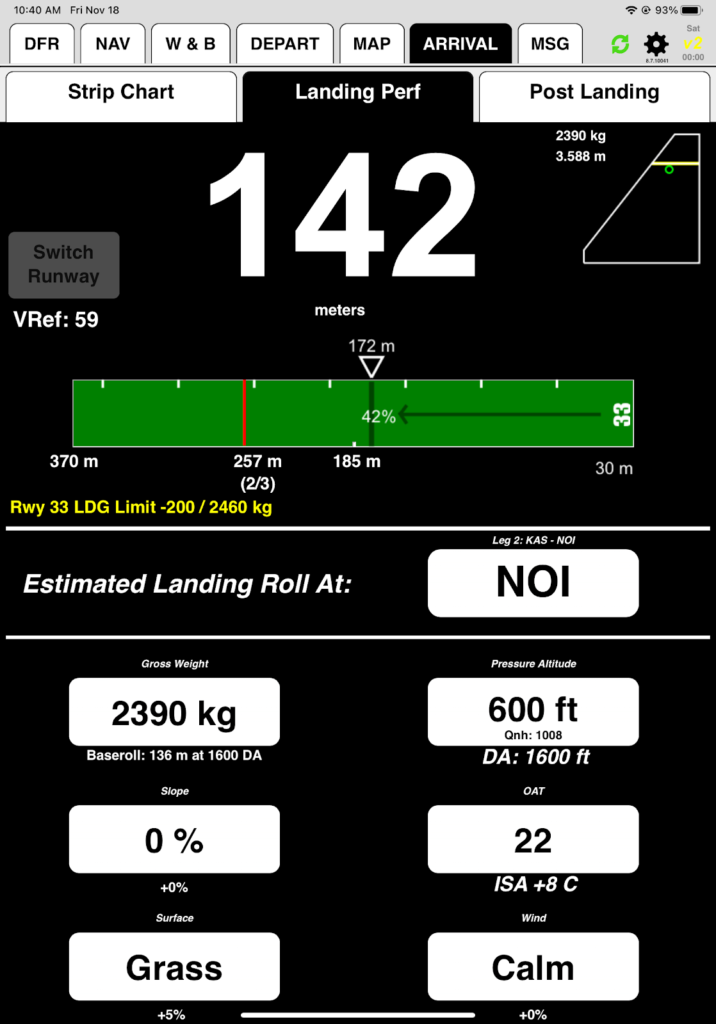
FlightSpan™ has calculated that you will be at 2390 kilograms when you arrive, which is below the landing weight limit of 2460 kilograms.
With a PA of 600 and OAT of 22, this results in a landing distance of 142 meters. FlightSpan™ adds the standard displaced threshold, in this case 30 meters (your company default can be set in FlightSpan™ Ops for each aircraft type), and marks your expected stopping point at 172 meters with a white triangle and the percent runway used.
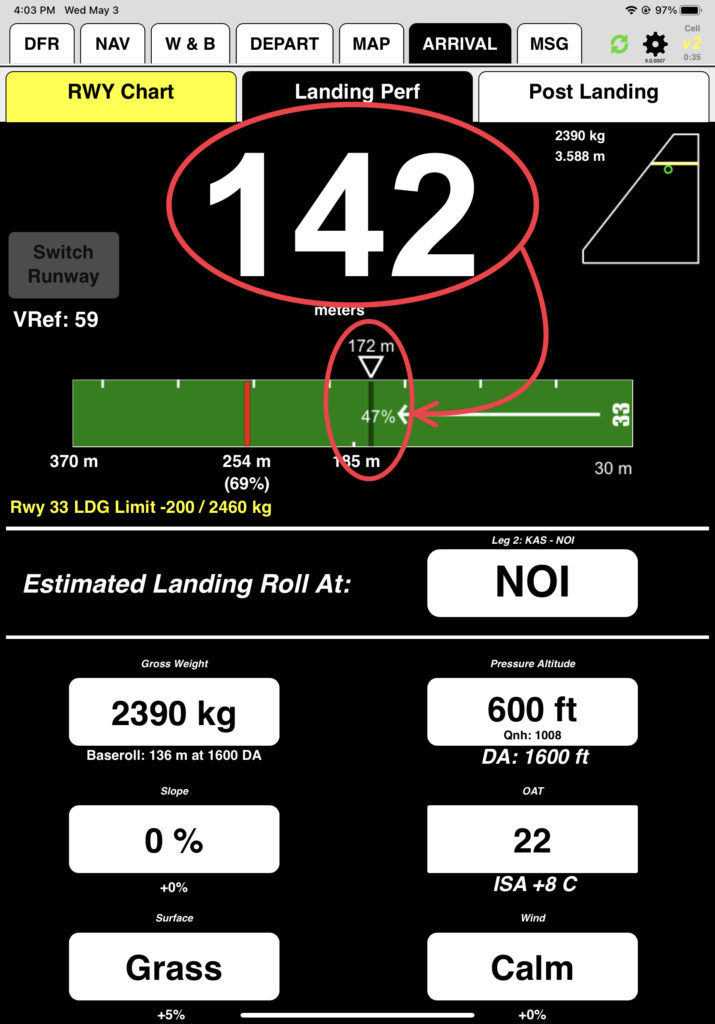
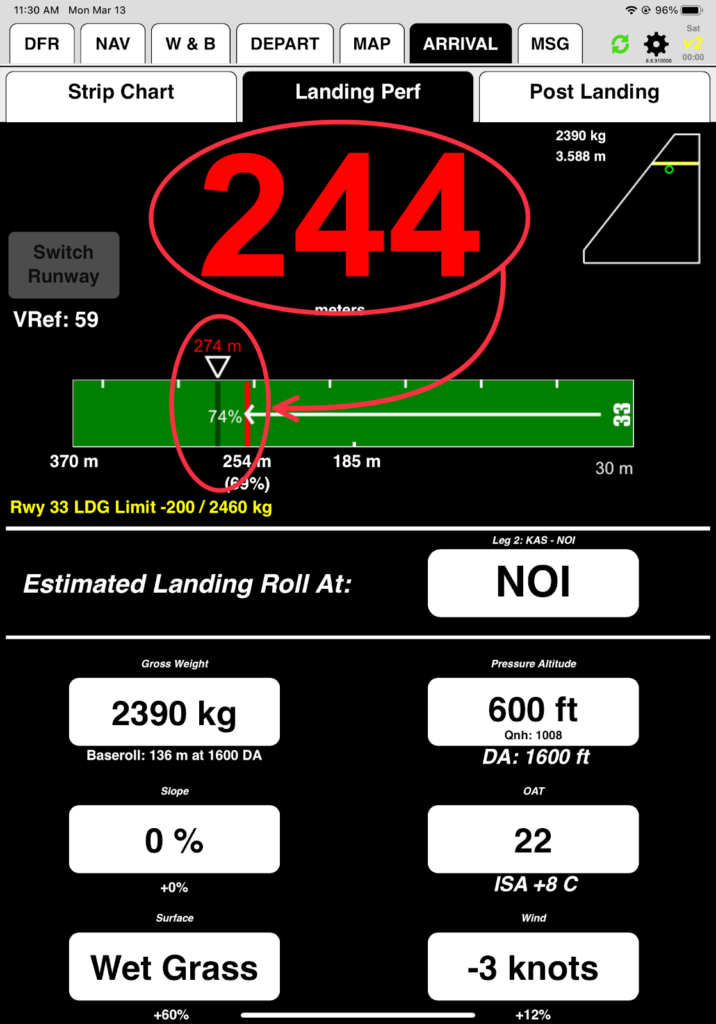
A red line is marked at the latest stopping point on the runway (a percentage of the runway set in FlightSpan™ Ops), and if the calculated stopping point is past that line, the stopping distance and stop point turn red. Try it by changing to Wet Grass and a 3 knot tailwind.
Note: Depending on the setting in FlightSpan™ Ops, the redline may not be exactly the company redline percentage if the standard displaced threshold is factored in.
For runways with a displaced threshold where the available length for landing has been set to be less than the full length of the runway, a notation will appear that describes how much of the runway is available for landing, along with a displaced threshold symbol.
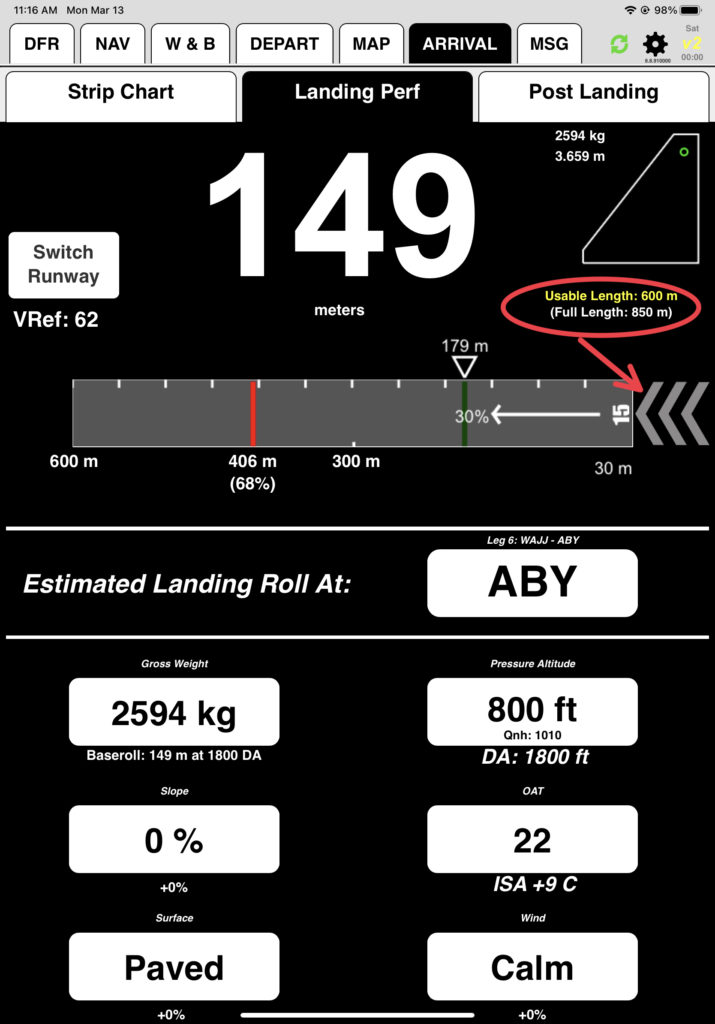
Note: The red line (maximum landing roll) is based on the usable runway. In the case above it is based on the 600 meters of usable runway, not the 850 full length.
In the next series of lessons, you will learn how you can expect FlightSpan™ to behave in flight, and how to operationally take advantage of the various planning tools.
Video Version